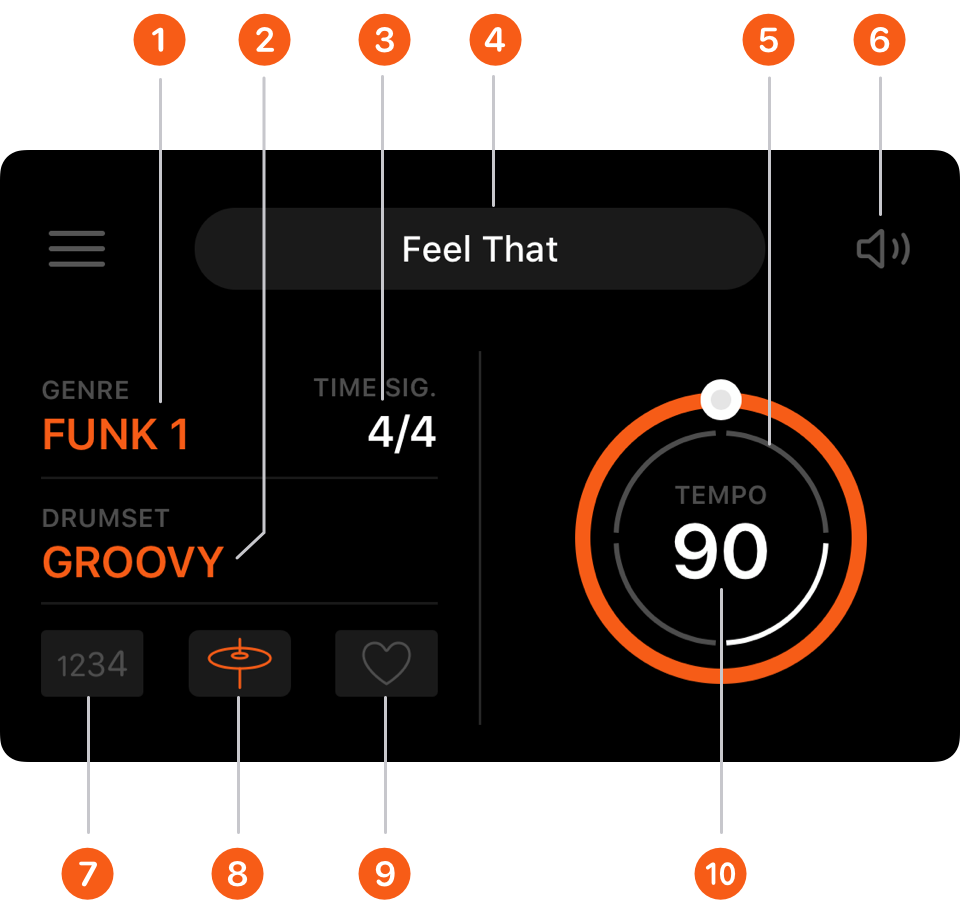
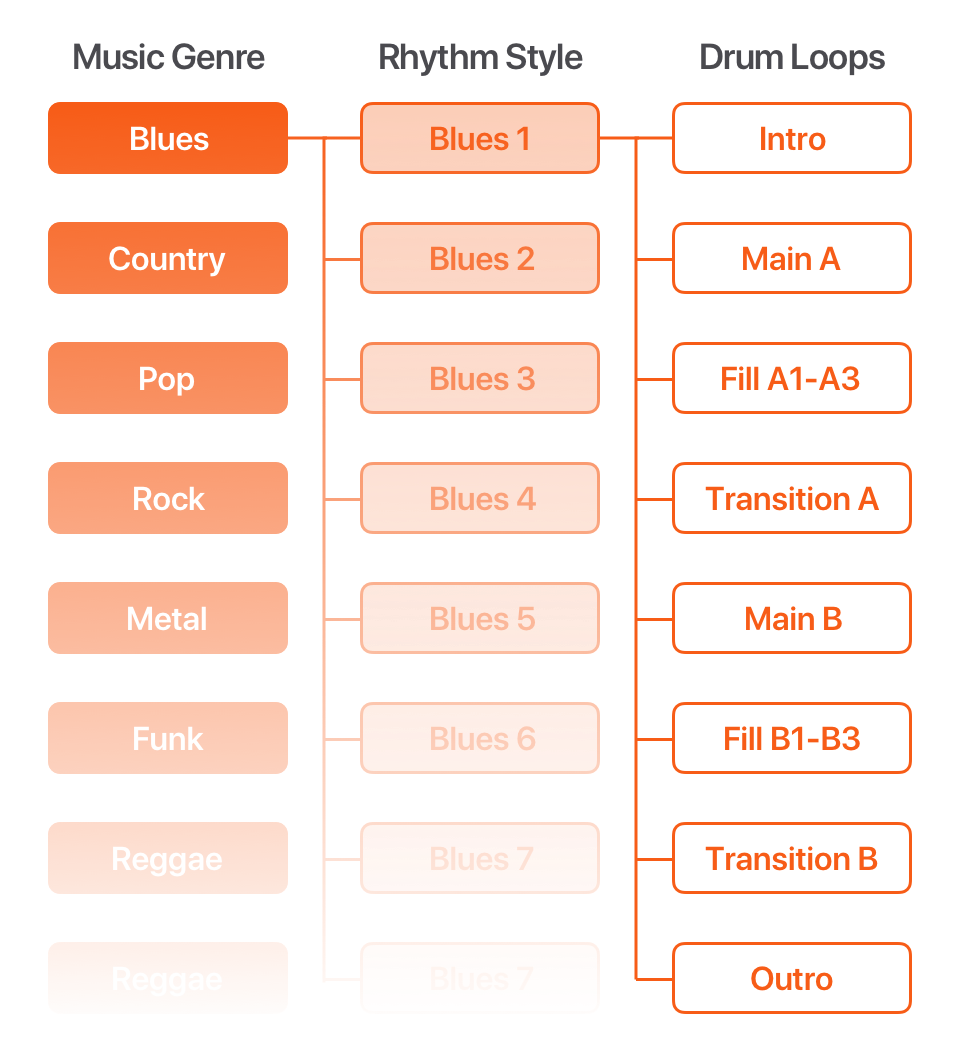
- Select music genre and rhythm style
- Change the drumset
- Time signature
- Open projects list
- Visual metronome
- Open the volume and reverb adjustment panel
- Count-in: Turns the count-in function on/off. If this is on, playback will start after a one-measure count.
- Auto accent hit
- Add to favorites
- Tempo: Use the Tempo dial or TAP TEMPO to change the playback speed (measured by BPM)
Each rhythm style includes 12 drum loops: intro, verse, chorus, six fills, two transitions, and outro.
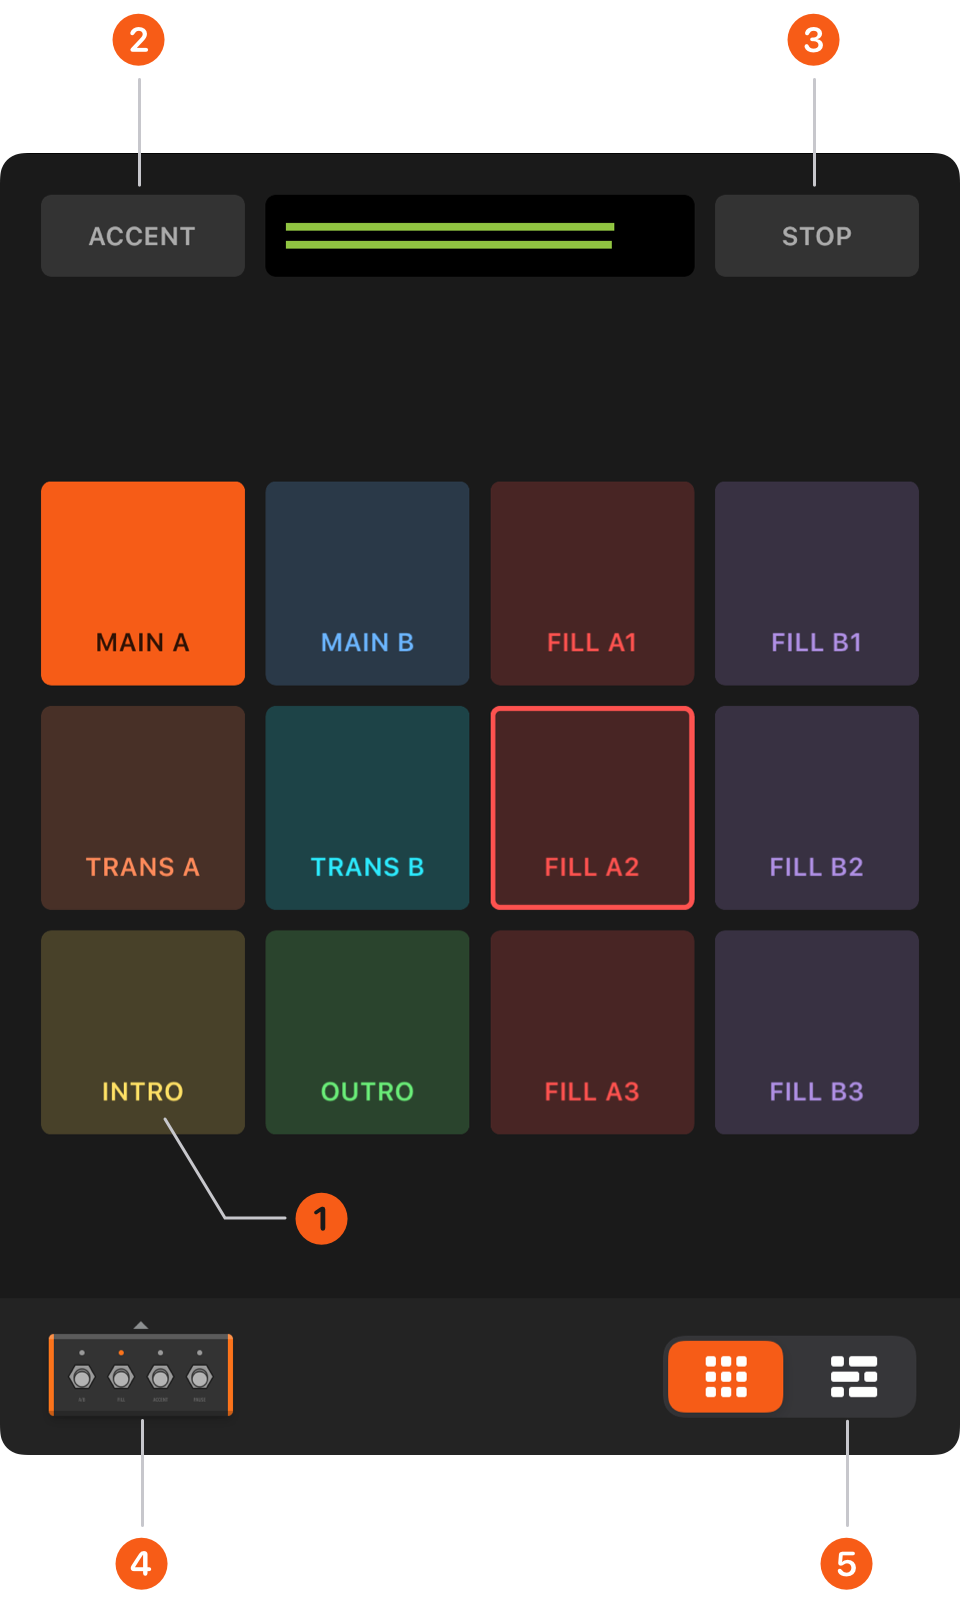
- Loop Pad: Tap to play a drum loop. To stop it, tap again.
- Accent hit
- Stop playback
- Footswitch control
- Switch to SONG Mode
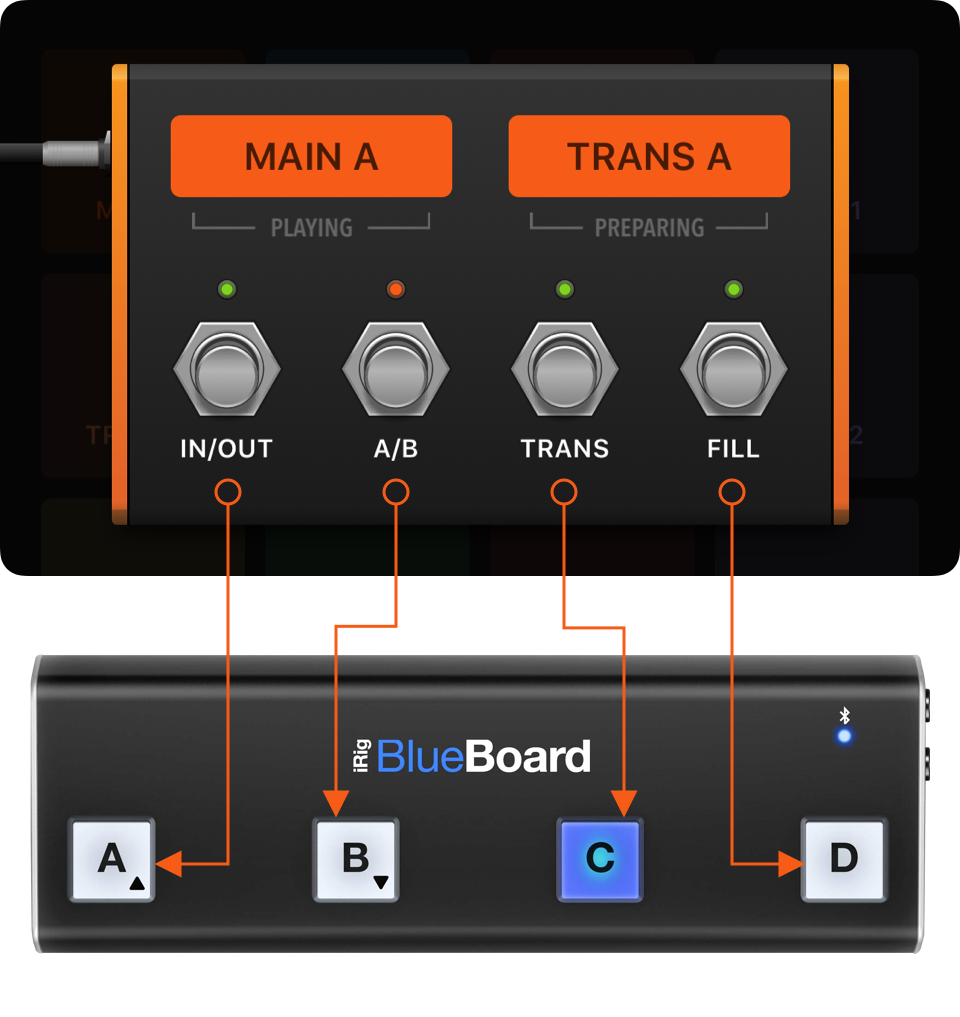
You can use the Pedal mode to play rhythm styles with four "FootSwitch".
Begin song by tapping the IN/OUT or A/B button.
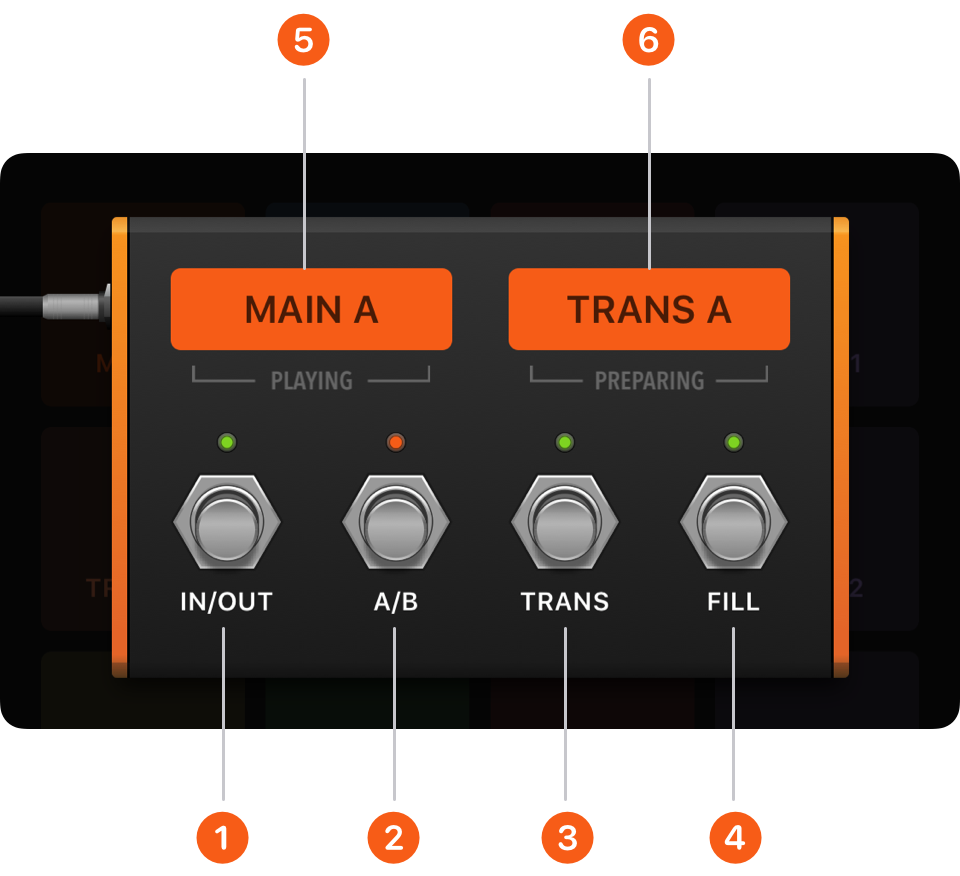
- IN/OUT: First tap, start the song with an intro fill, and then goes to the verse(A). When you want to end the song, tap the IN/OUT button to end with an outro fill.
- A/B: Switch directly between the verse (A) and chorus (B).
- TRANS: Begin transition and advance to next song part when transition ends.
- FILL: Insert fill (different fill each time)

* Different fill each time.
You can connect rhythm patterns to create a complete drum track that's appropriate for your own song, and play it automatically. 15 different rhythm patterns can be used with each song ( includes intro, Main A, Main B, six fills, two transitions, outro, accent hit, Hi-hat, and empty).
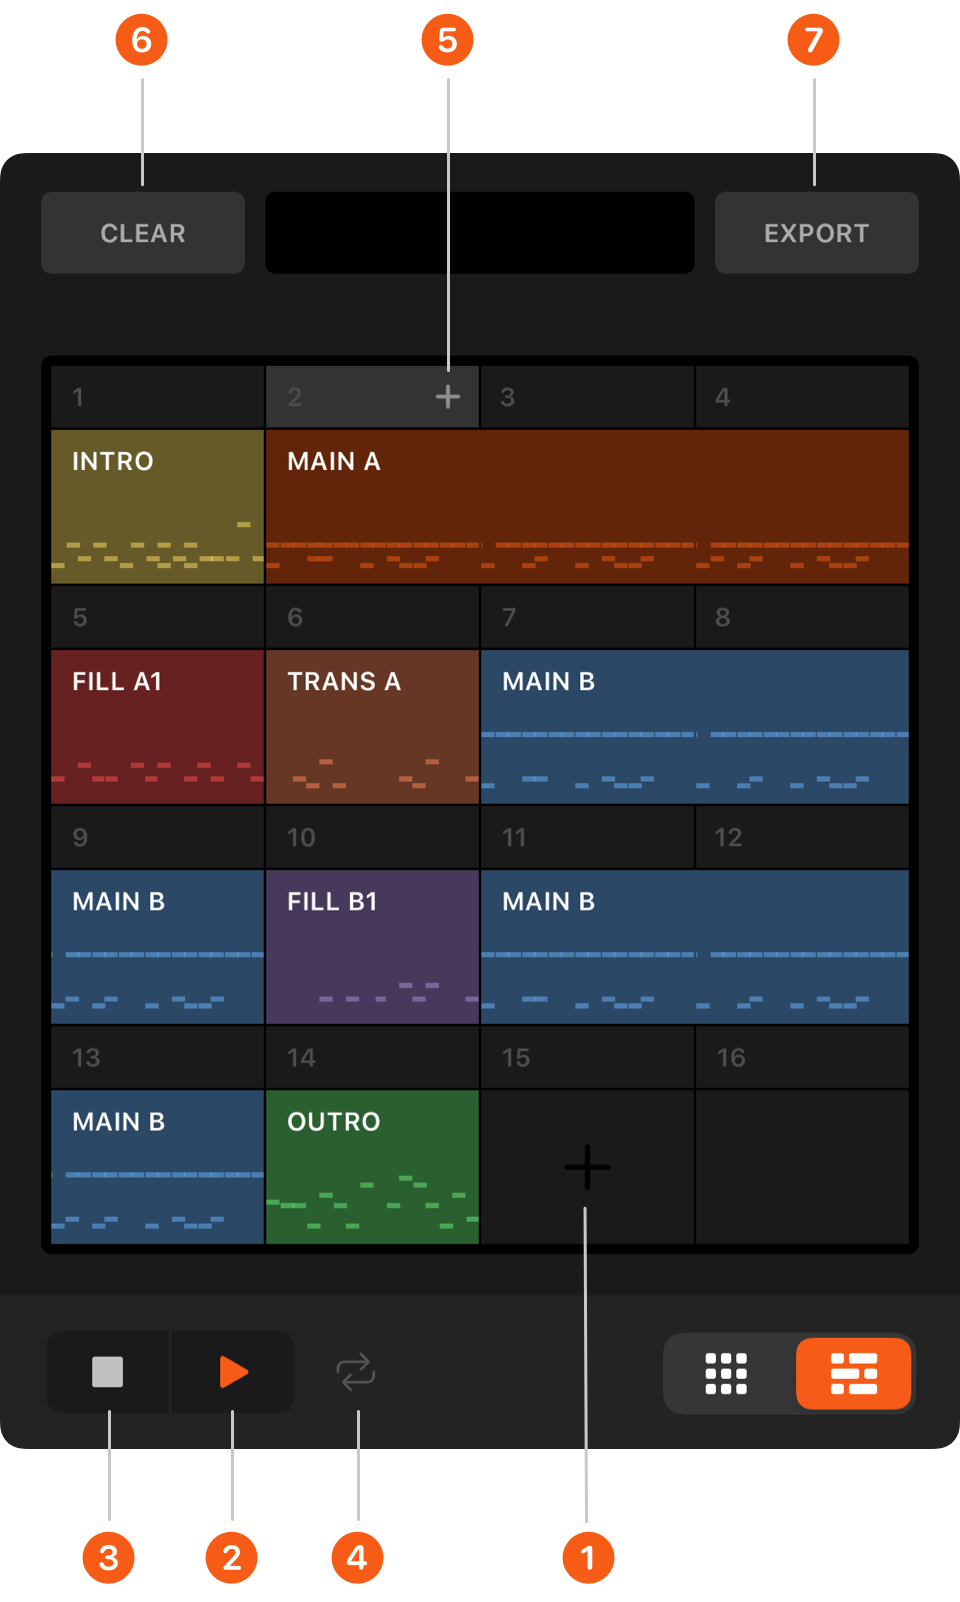
- Add one pattern
- Start or pause playback
- Stop playback
- Play repeatedly
- Insert one pattern
- Clear this soundtrack
- Export and share audio
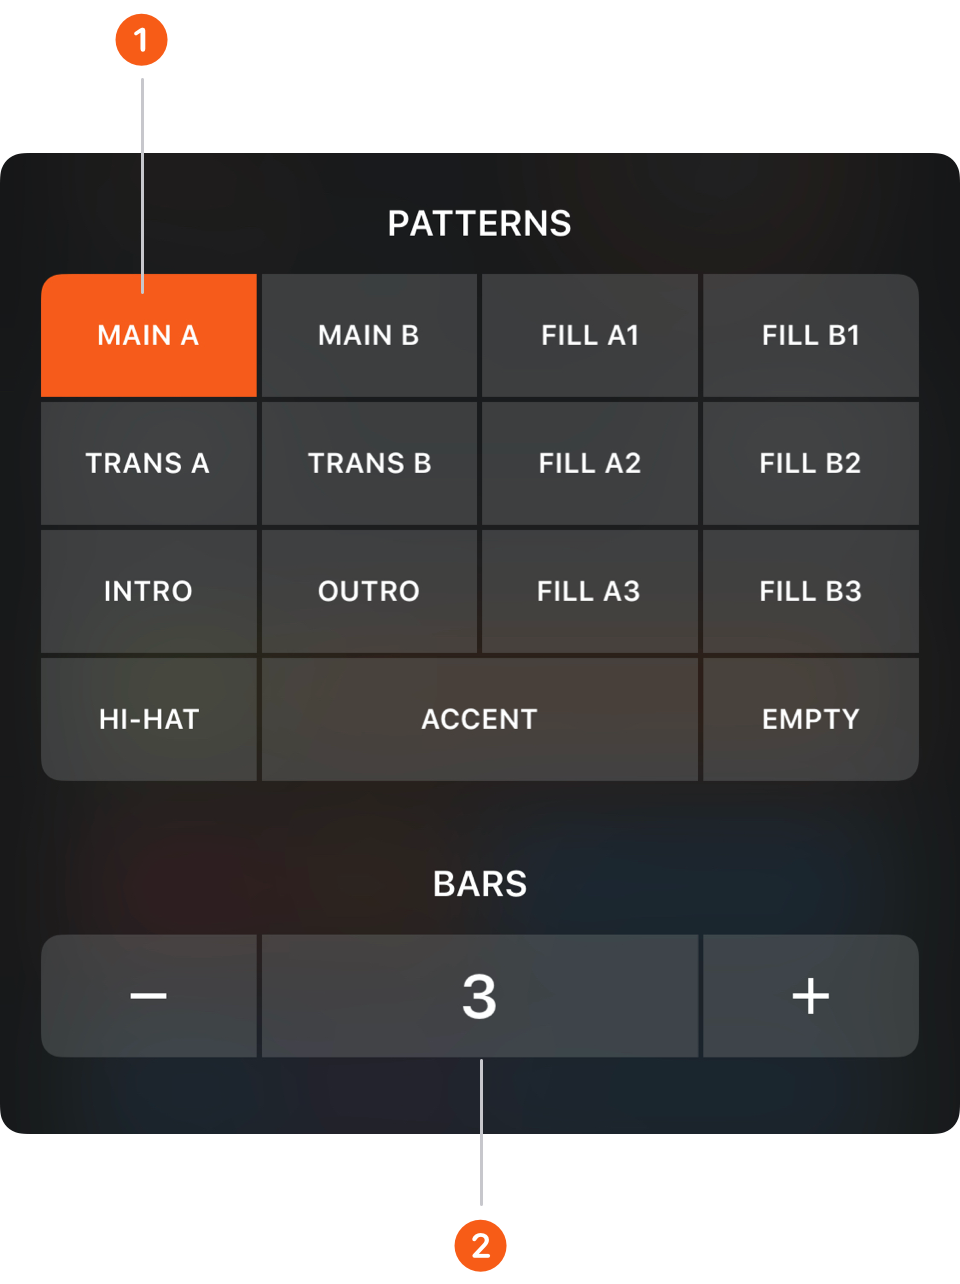
- Choose a suitable drum loop
- Set the number of measures
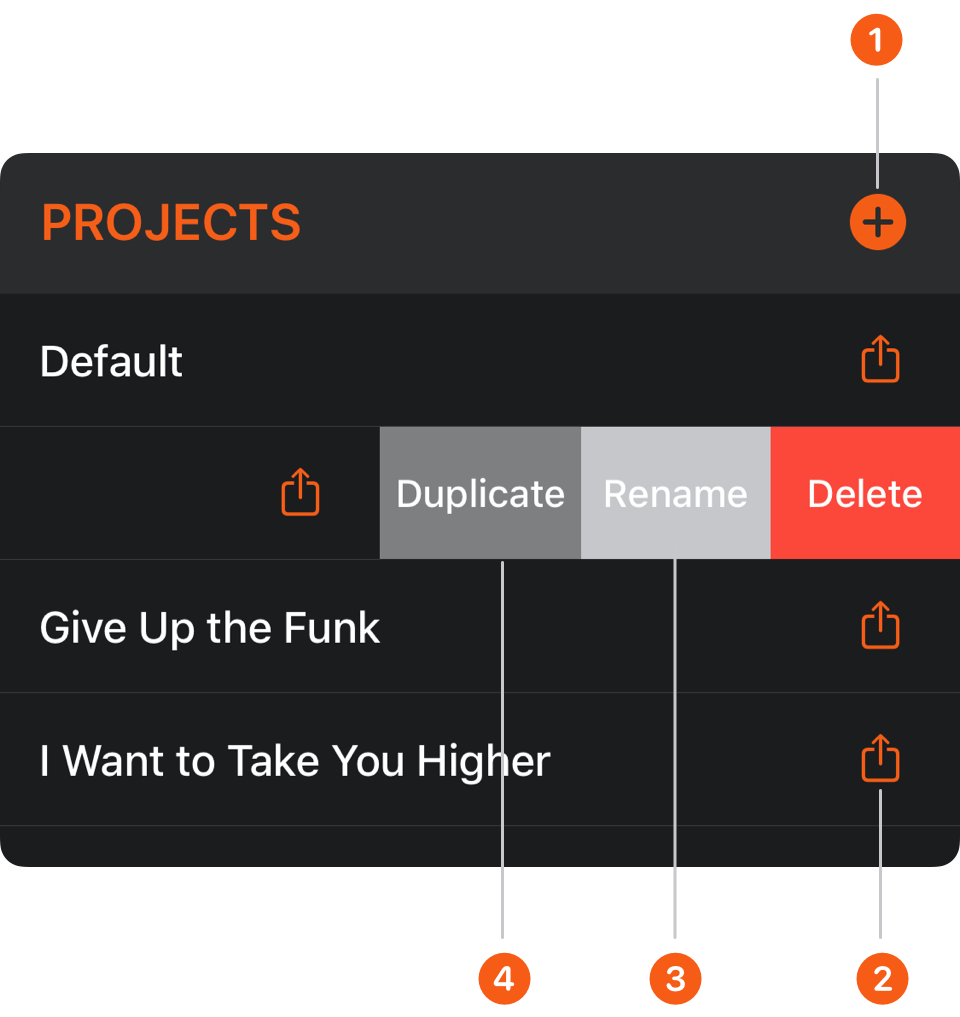
- Create a new project
- Export and share audio
- Rename this project
- Duplicate project
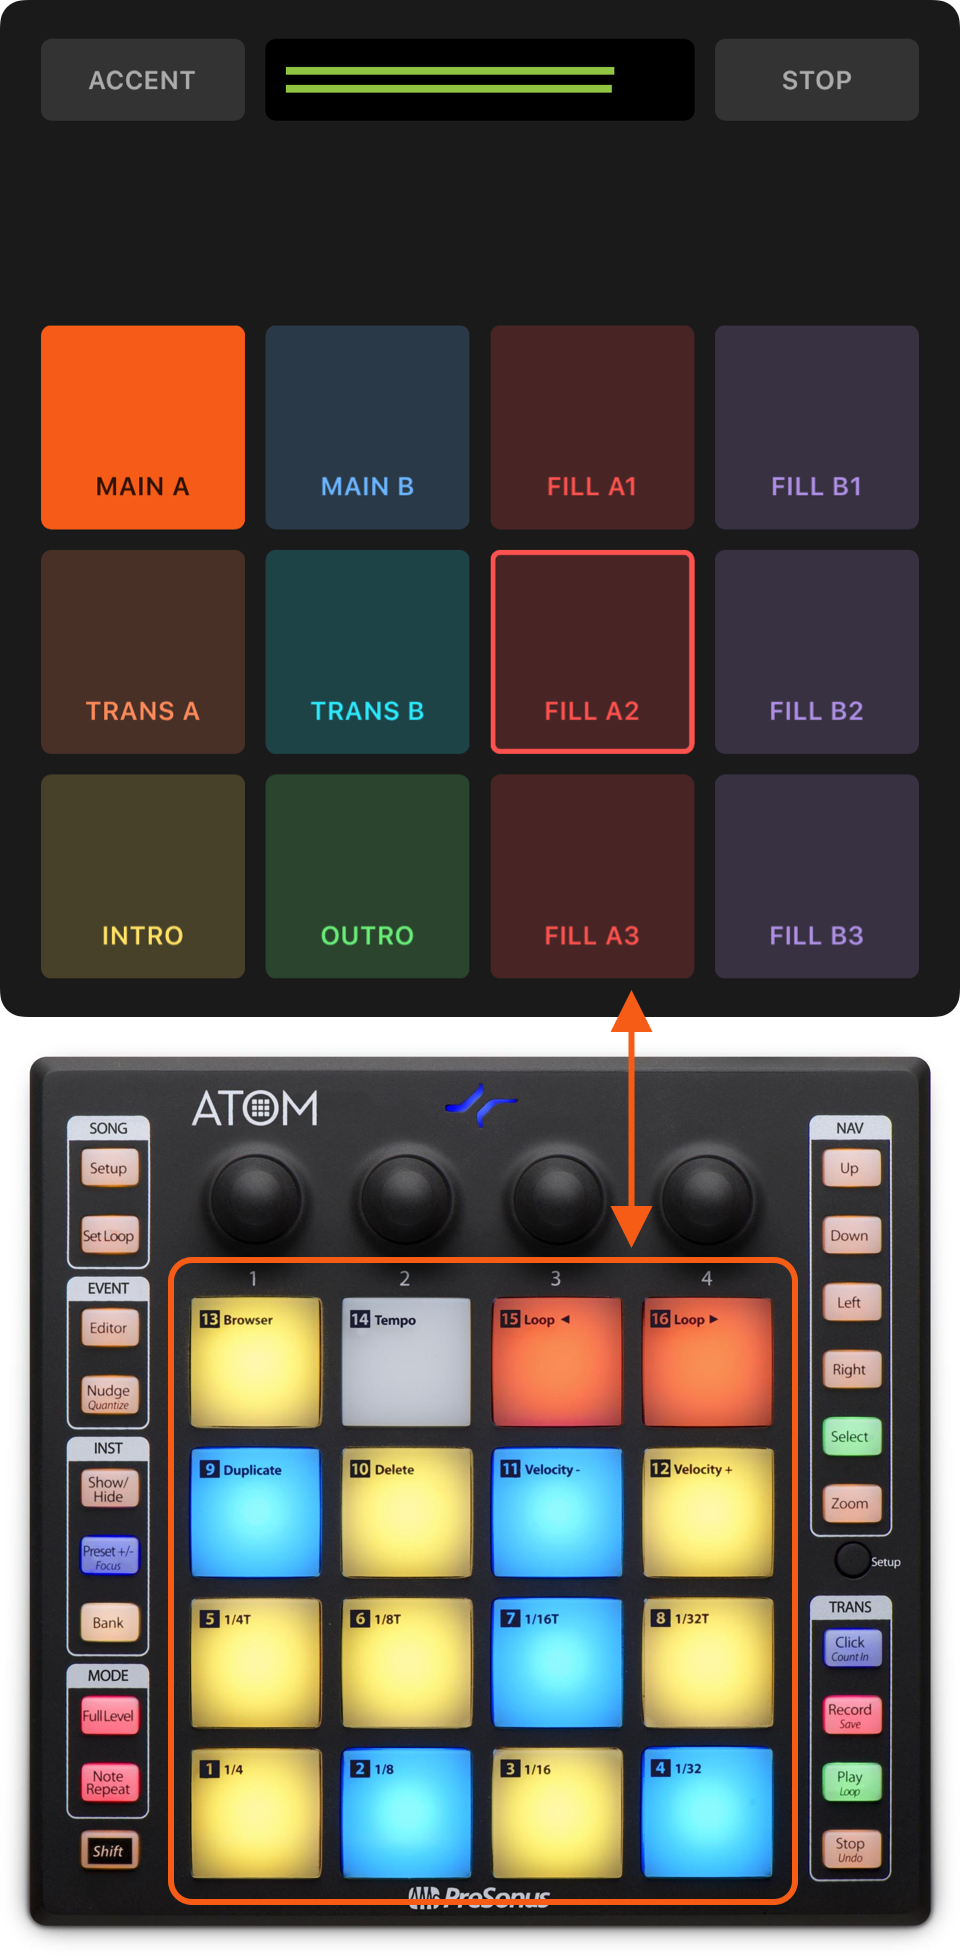
You can connect a USB MIDI Pad Controller to your iPhone or iPad to play rhythm patterns in Pad Mode.
1. Connect your USB MIDI Controller to iPhone or iPad with the Lightning to USB 3 Camera Adapter.
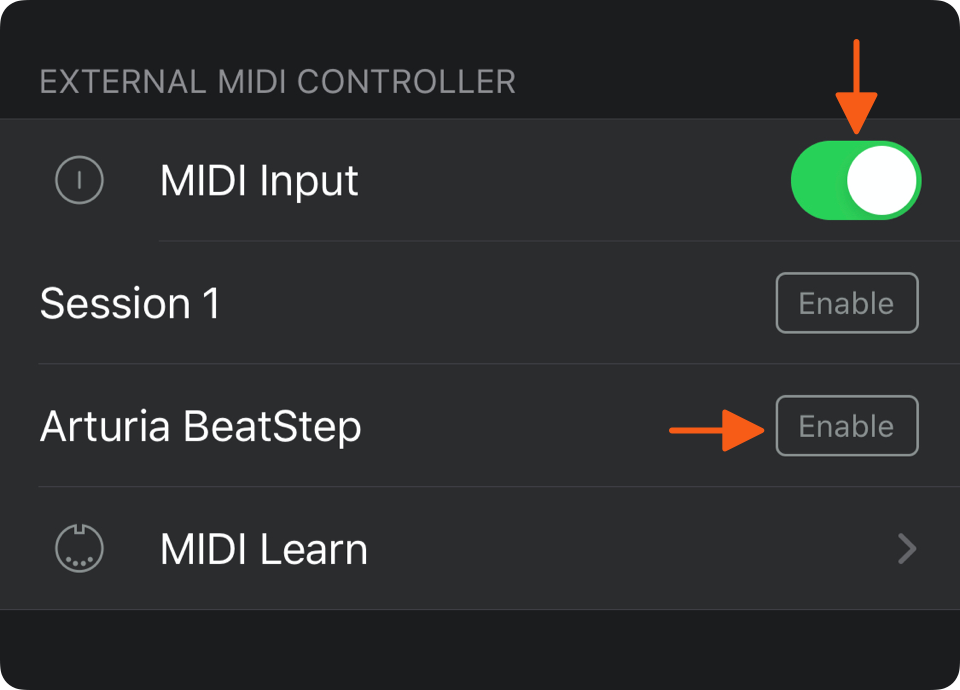
2. Go to Beat Station App
↳ App Settings
↳ Turn on MIDI Input
3. Select your MIDI Controller from the input device list and tap Enable.
Most class-compliant USB MIDI controllers can be connected to the iPhone or iPad using the Apple Lightning to USB 3 Camera Adapter.
To find out if your USB device is class compliant, check the manufacturer's web page. If it connects automatically to any computer without requiring you to install drivers from a website or a disk, it is probably class compliant.
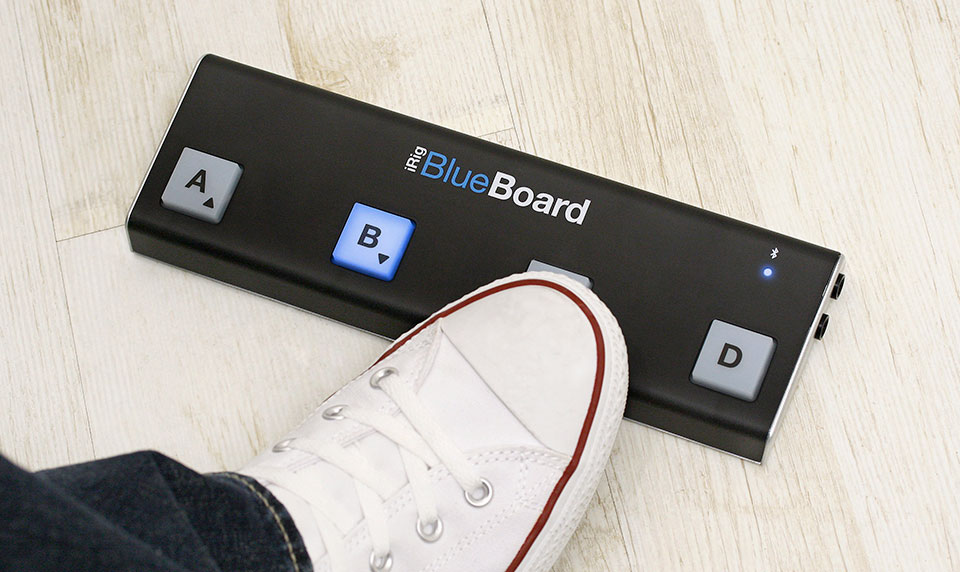
By using a Bluetooth MIDI pedalboard, you can perform operational tasks without having to take your hands off of your instrument. This includes operations same as the Pedal Mode.
1. Connect your Bluetooth MIDI Pedalboard to iPhone or iPad.
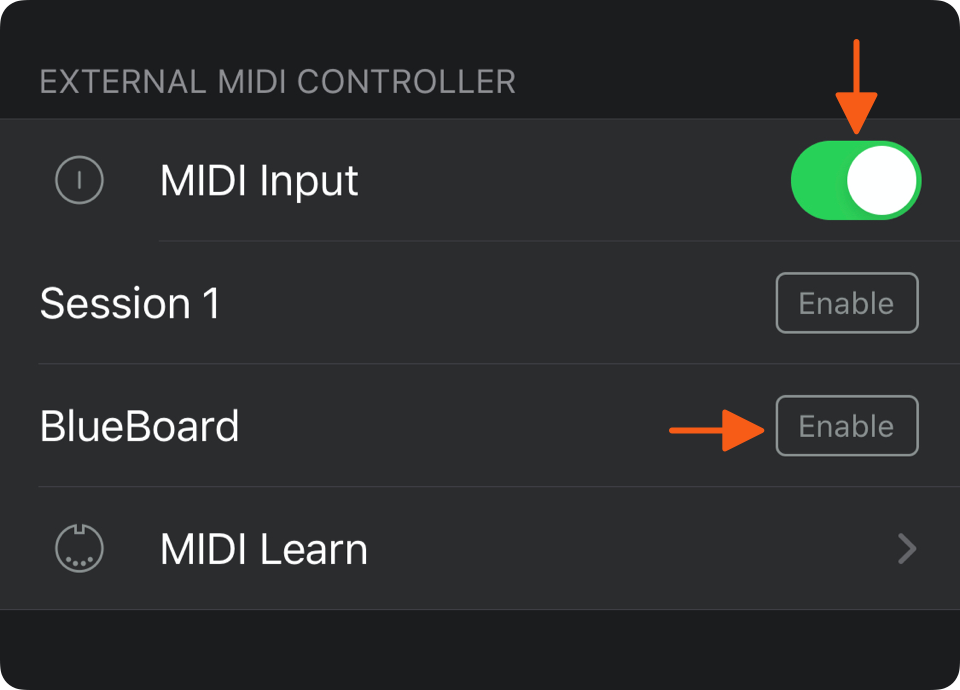
2. Go to Beat Station App
↳ App Settings
↳ Turn on MIDI Input
3. Select your Bluetooth MIDI Pedalboard from the input device list and tap Enable.
Compatible Devices:
- iRig Blueboard
- AirTurn BT200S-4
- Positive Grid BT4
MIDI Learn is a quick and easy method for assigning hardware controls to screen controls.
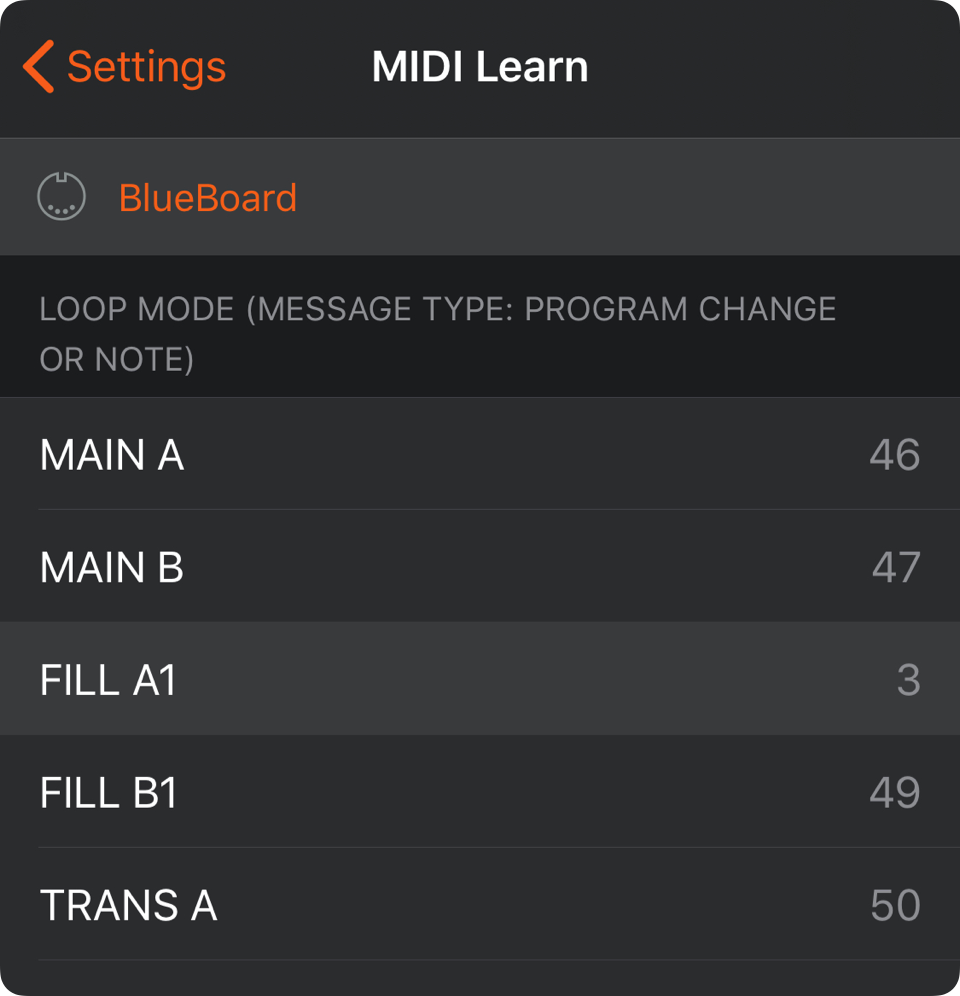
Learn a MIDI controller assignment:
- Select the screen control (Loop pads or Foot switches) you want to learn. The selected item appears highlighted in gray.
- On your MIDI controller, move the corresponding hardware control you want to assign. Incoming MIDI message the app receives will be assigned to that screen control.
You can send MIDI messages to your DAW or other apps on Mac over USB Cable, Bluetooth or Network.
Using MIDI over USB Cable
1. Connect your iPhone or iPad to your Mac with the Lightning to USB cable
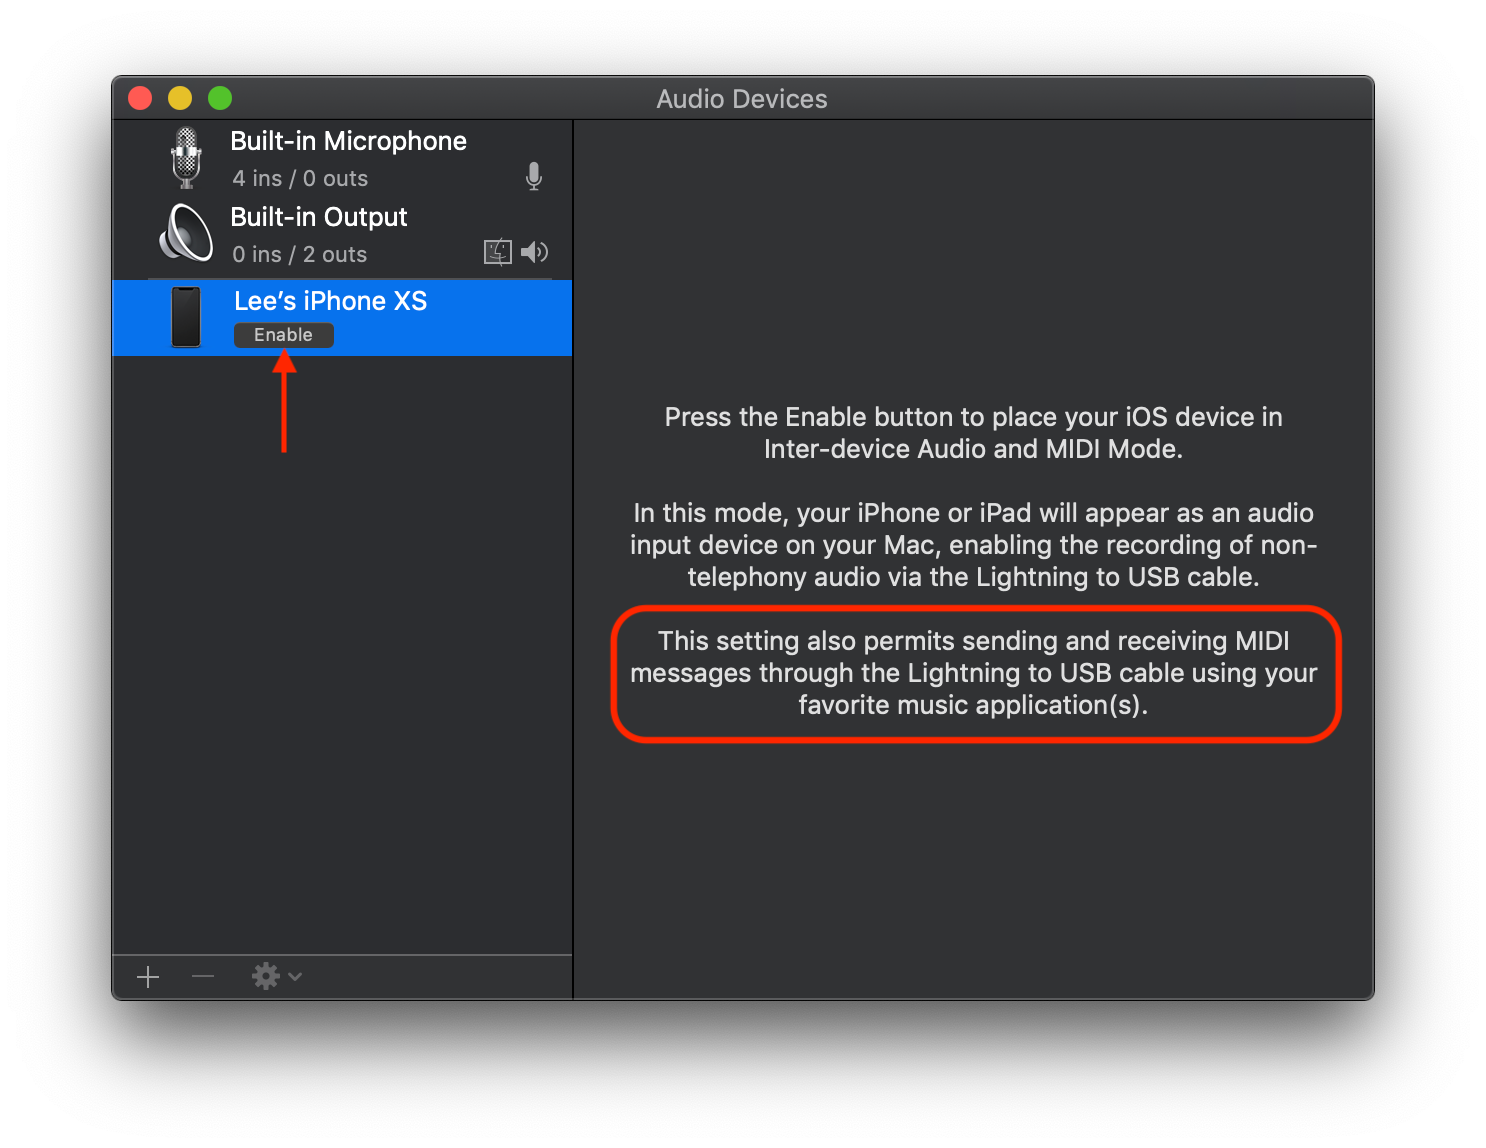
2. Open Audio MIDI Setup on your Mac
3. Select your iPhone or iPad from the device list on the left and click Enable
4. Your iPhone or iPad will show up as a new input source in Sound Preferences
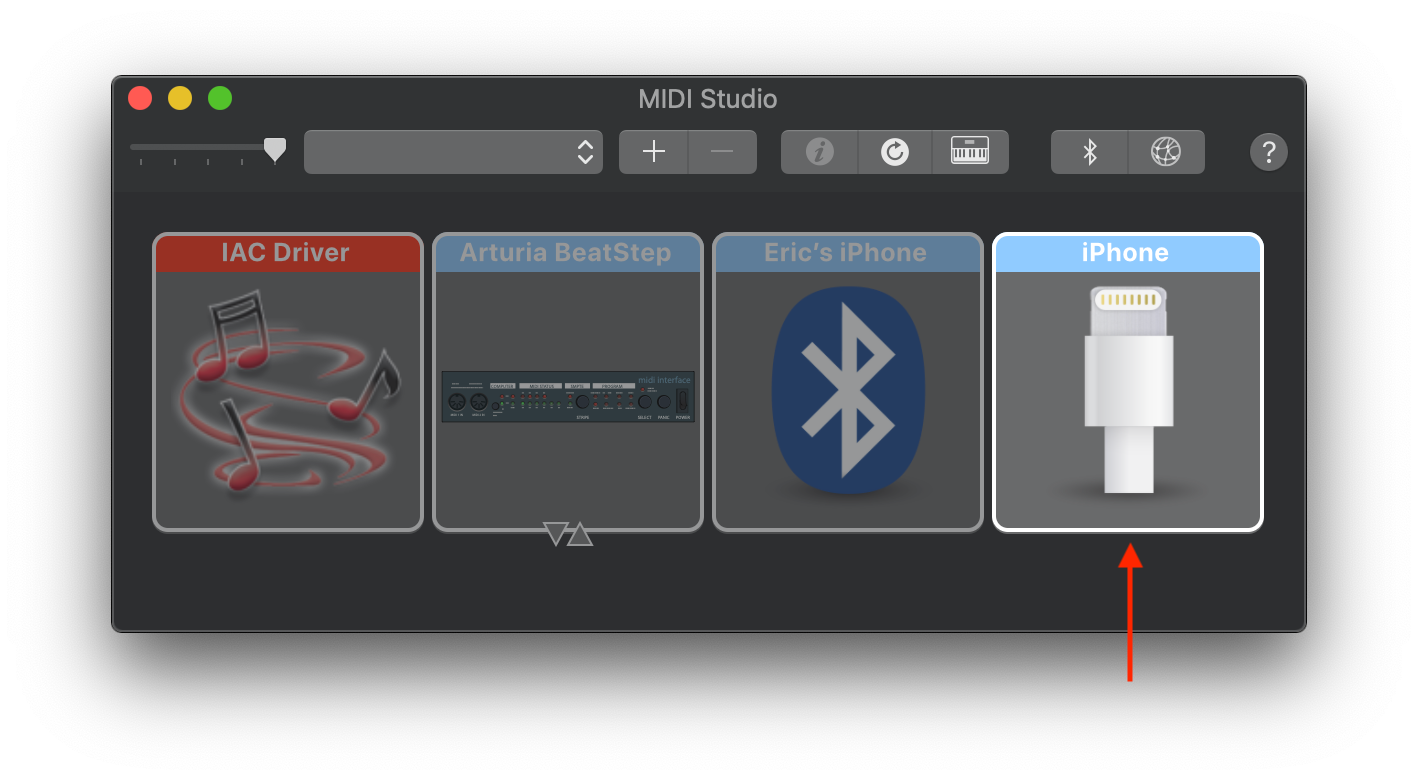
5. Go to Window -> Show MIDI Studio
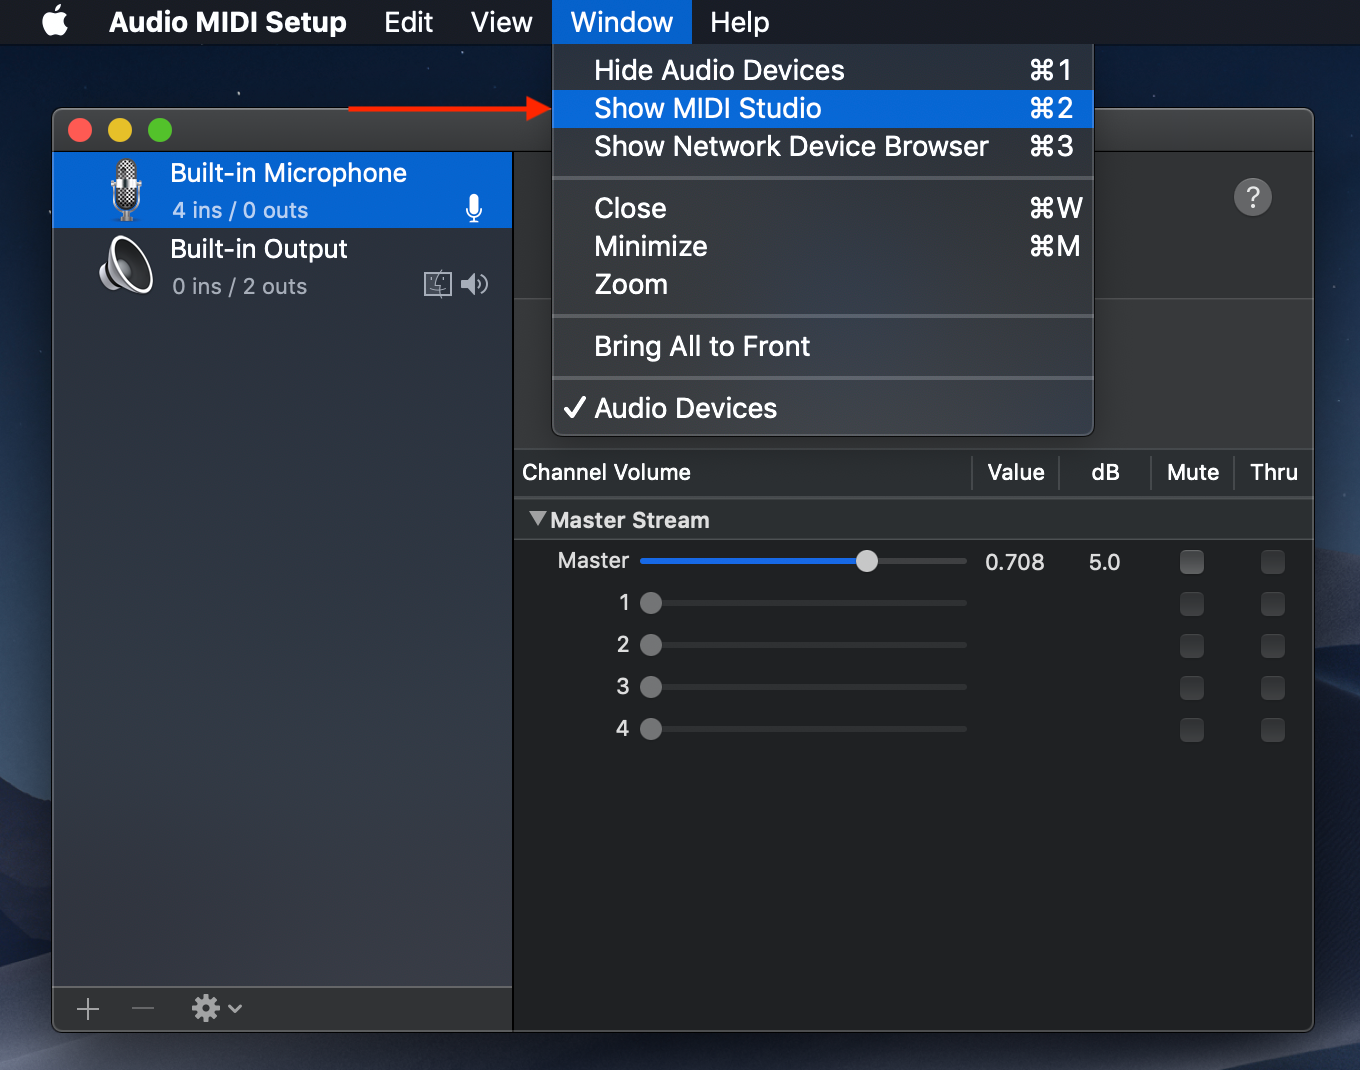
6. Now your iPhone or iPad is a MIDI input for your Mac
7. Go to Beat Station App
↳ App Settings
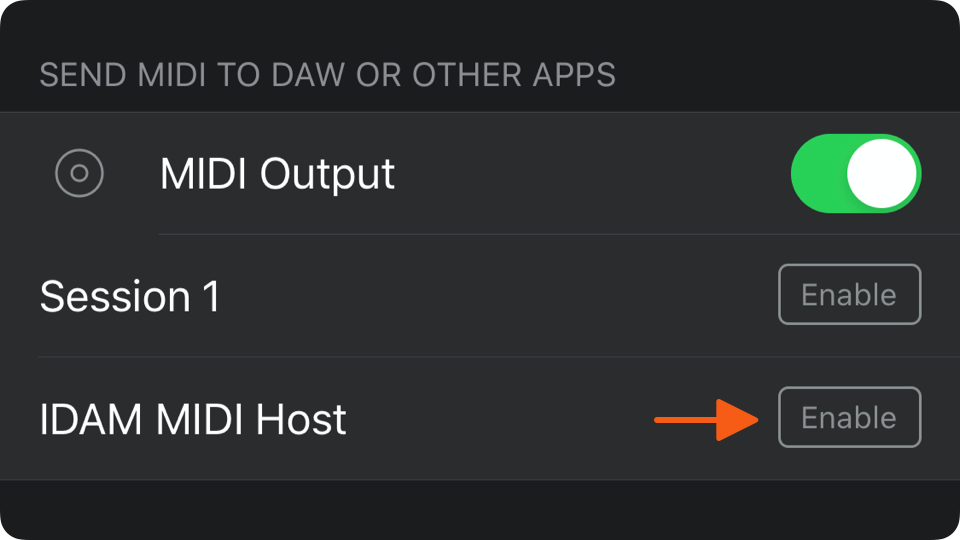
↳ Turn on MIDI Output
↳ Enable "IDAM MIDI Host"
Using MIDI over Bluetooth
1. Open Audio MIDI Setup on your Mac
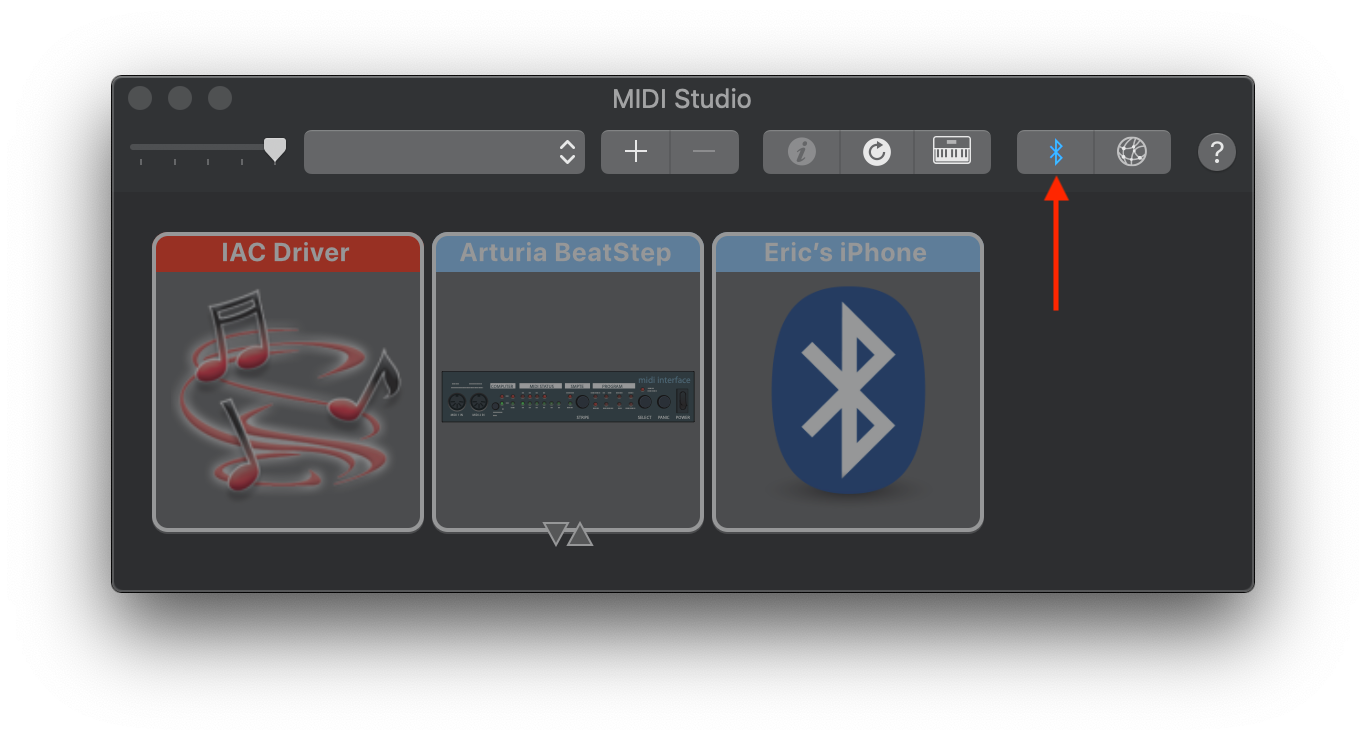
2. Go to Window -> Show MIDI Studio
3. And click on Bluetooth to open Bluetooth Configuration
4. Make sure that the Bluetooth of your iPhone or iPad is enabled.
Then go to Beat Station App
↳ App Settings
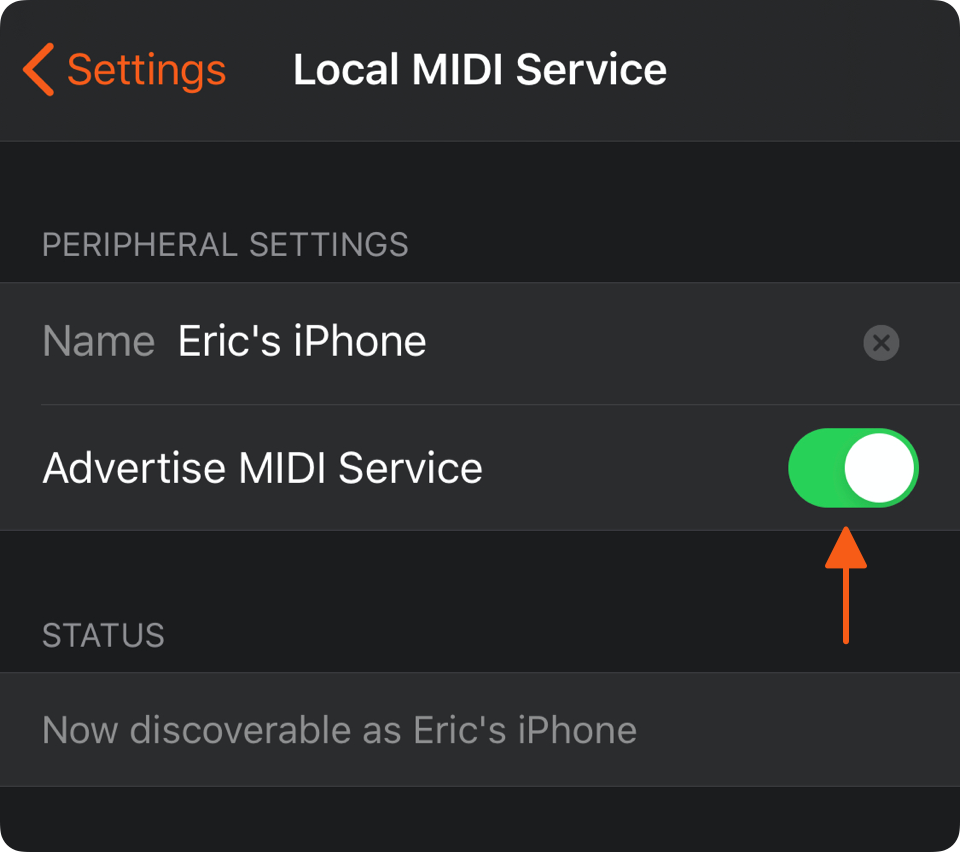
↳ Tap Bluetooth MIDI
↳ Advertise MIDI service
5. Once you advertise the MIDI service from the app, your iPhone or iPad will appear in the list of Bluetooth devices on your Mac’s Bluetooth Configuration window.
6. Select the “Connect” button to establish the Bluetooth MIDI connection.
Once you establish the connection, your iPhone or iPad will appear highlighted at MIDI studio.

7. Go to Beat Station App
↳ App Settings
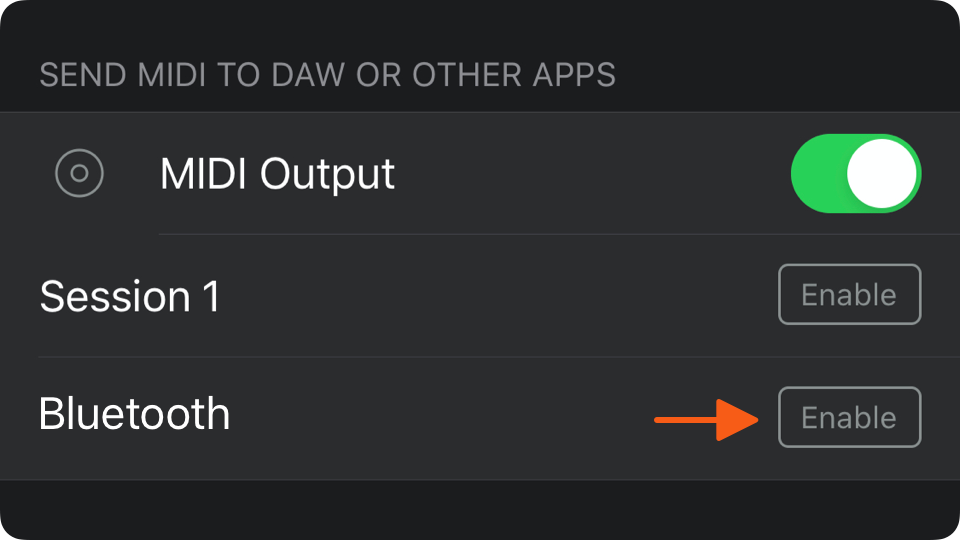
↳ Turn on MIDI Output
↳ Enable "Bluetooth"
Using MIDI over Network
1. Open Audio MIDI Setup on your Mac
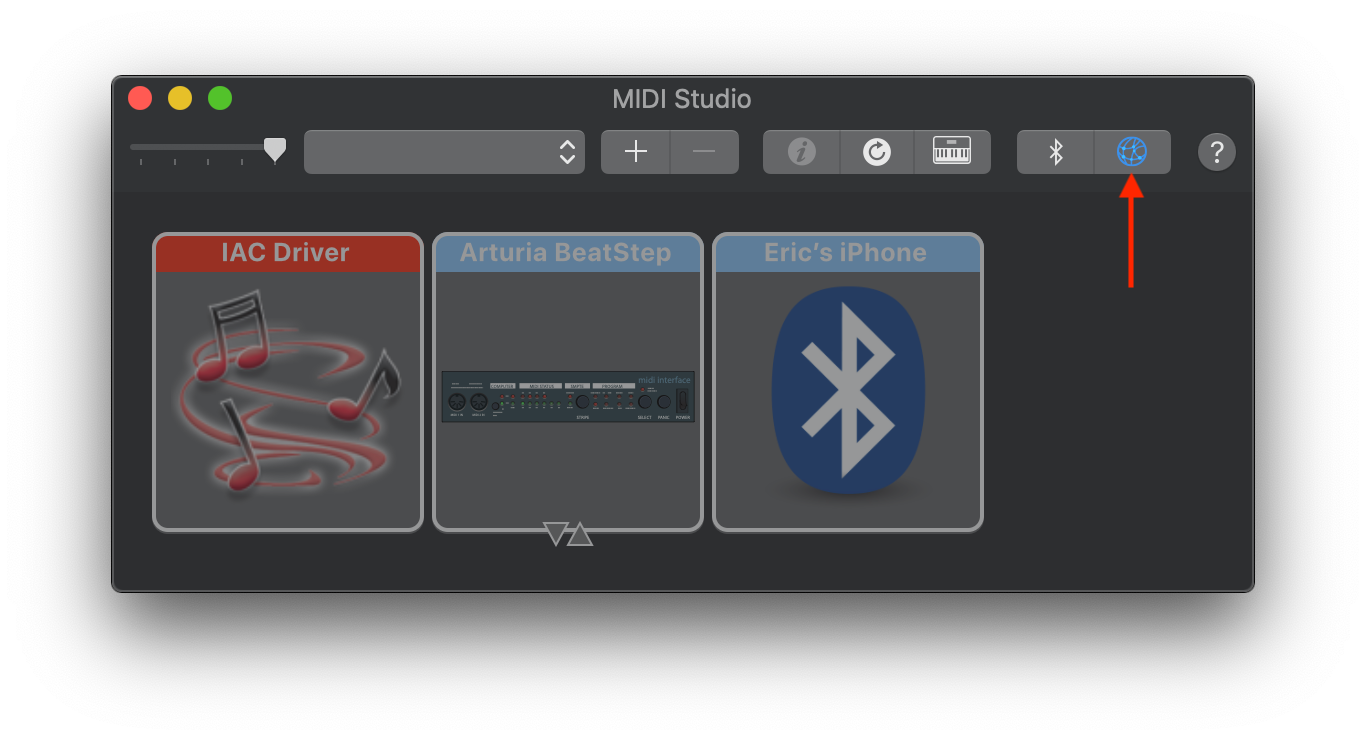
2. Go to Window -> Show MIDI Studio
3. And click on Network to open MIDI Network Setup
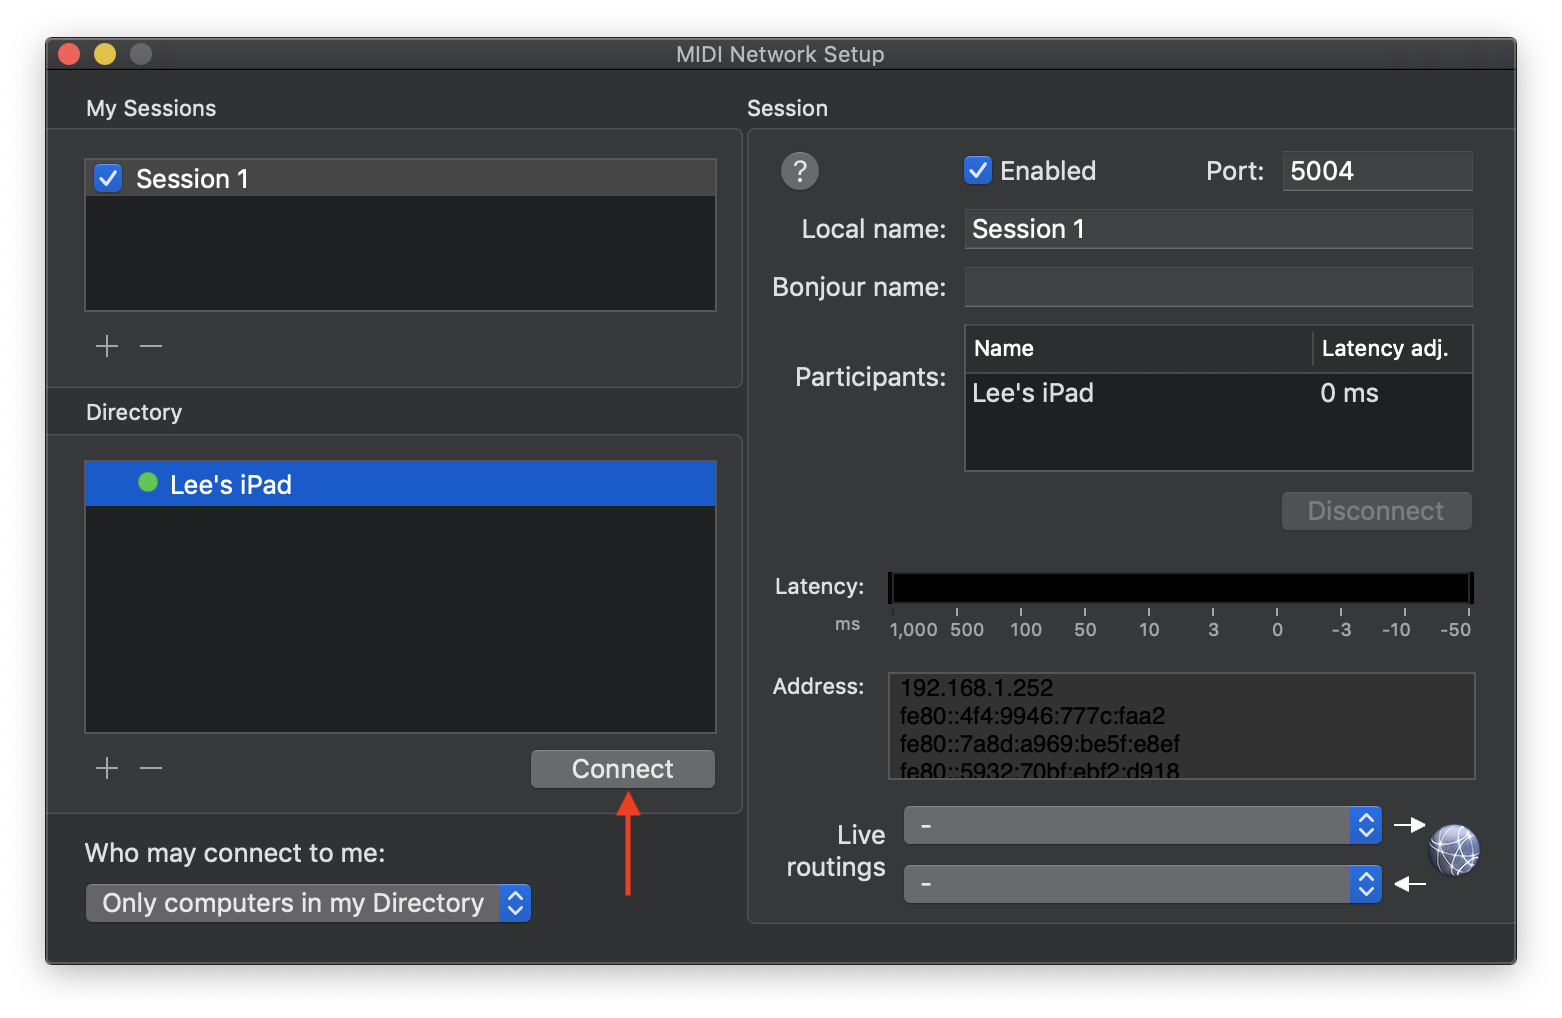
4. In MIDI Network Setup, select + sign under “My Sessions”
5. Click on the box of the created session
6. Make sure it is set to be discoverable by “Anyone”
7. Enable the session by checking the top right box
8. Then select your iPhone or iPad in the directory and click connect.
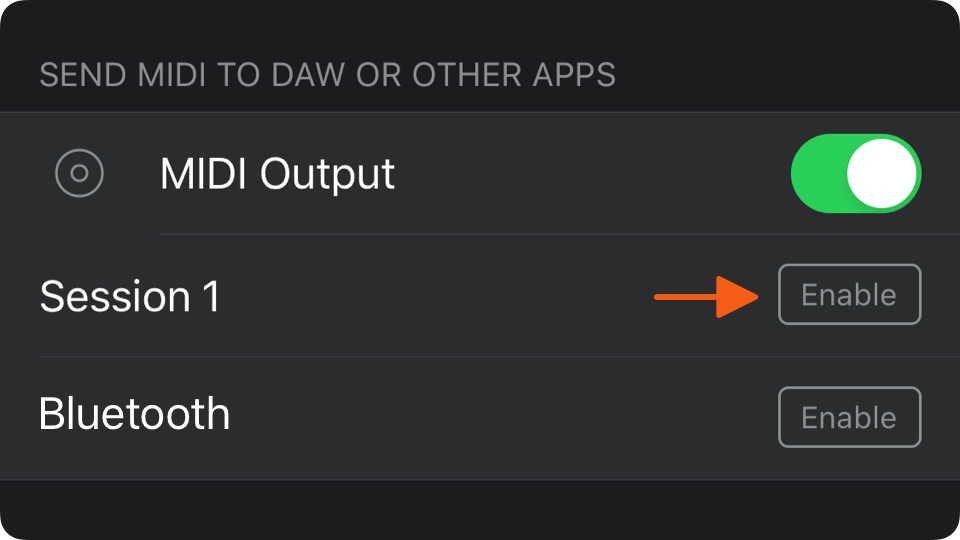
9. Go to Beat Station App
↳ App Settings
↳ Turn on MIDI Output
↳ Enable "Session 1"
If your iOS device does not appear in the directory, please make sure that the iOS device and the Mac are connected to the same wifi network.